
Kick drums are an integral component of electronic dance music. It’s no wonder so many producers spend countless hours tweaking, fiddling and adjusting the kick. Equally as important is the emergence of plugins dedicated to kick drum synthesis. In this synthwave tutorial, we’ll discover how to layer kick drums in Ableton Live while relying on series of visual and auditory cues.
Question: How to Layer Kick Drums?
Answer: Sound engineers and music producers often layer kick drums, each of which contain different characteristics, that when combined, fill up the frequency range of the spectrum while providing a unique sound. Typically, kick drums are layered with a low frequency-rich sub kick and a punchier mid-range kick. On some occasions, a hi hat or click is used as a top layer. Furthermore, the techniques offers control of the overall kick sound by compartmentalizing various components of the kick, meaning that producers can mute and unmute the individual tracks at specific moments during an arrangement.
Why Layer Kick Drums?
Kick drum layering is nothing new. For years, producers, keen on developing a unique sound, would layer various kick drum elements together. For instance, a sub kick (808) is widely used as a foundation while the mid range kick drum layer provides the lower mids and upper ranges. By all means, the combinations are endless and provide another level of creative control not found when using a single kick drum sample. That is to say, kick drum layers are muted and unmuted at key points during a track to vary the intensity levels of a given segment of an arrangement.
Are Your Kick Drums in Phase?
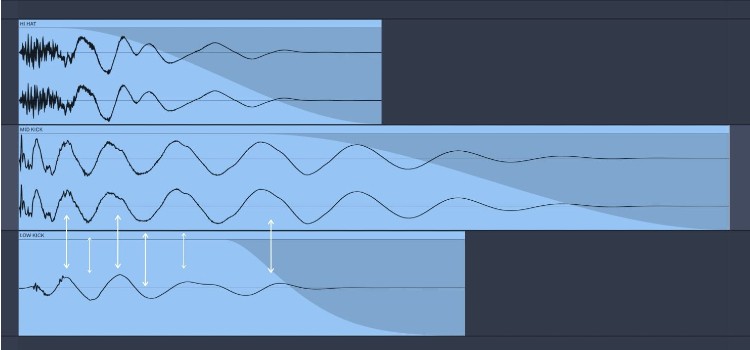
In case you’re wondering how to layer kick drums, a concern of utmost importance is their phase relationship. Kick drum layering comes with a series of problems, in particular their ability to go out of phase. For instance, all waveforms have a shape made up of peaks and valleys. If the peaks and valleys of the kicks are out of sync, they’ll be out of phase. As a matter of fact, out-of-phase waveforms cancel each other resulting in weak, quiet and anemic kick drum sounds.

How to Layer Kick Drums?
To layer kick drums do the following. Located a pair of kick drums and import them into your project. I recommend using audio files. Ensure that one kick contains low-frequency information. Conversely, the mid range kick should provide lots of punch in the mid range.
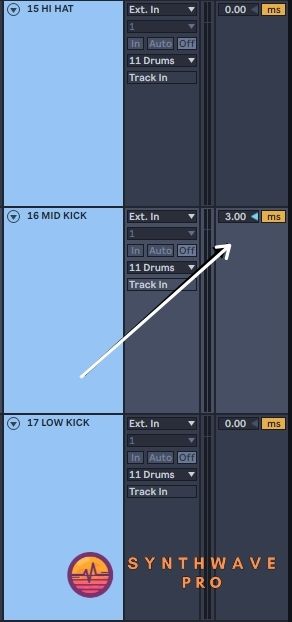
In a sequencer, stack one on top of the other. Zoom in and ensure that the waveforms’ peaks and valleys are in sync. At this point, you may need to make micro adjustments by sliding the sample left or right to align the peaks and valleys of both waveforms. Alternatively, use Ableton’s track delay control to micro shift the samples by a few milliseconds. See image.
Equally important, is the kick drums upper layer that if often made up of a single hi hat sample. Typically, this is a mild “click” sound that is added to the kick drum complex. In short, a soft click will focus a kick drum sample and highlight the transient nature of the overall kick.
Conversely, white noise generators are often preferred instead of a hi hat click sound. A synthesizer’s noise generator and its corresponding amp envelope can generate a brief “tick” sound as an alternative.

Finally, apply volume fades to control the sustain and release of the kick drum samples. As a general rule, the shorter the sub kick the better as longer durations tend to consume headroom – this will also provide much needed space for the synth bass.
How to Mix Kick Drum Layers
A final step in making layered kick drums work together involves EQ. Generally, a sub kick should have some higher frequencies rolled off to accommodate the mid range and hi hat click. Alternatively, sub frequencies of the mid range kick is rolled off to give space to the sub kick. For instance, it’s not uncommon to see a band pass filter applied to the mid range kick drum. Moreover, a great saturator can warm up the mid range kick drum. Finally, buss the three tracks (sub, mid kick and hi hat) to a buss and add compression to glue the finalized sound together.
Kick Drum Layering Plugins
You can always layer kick drums by importing samples to Ableton’s simpler device. However, the visual cues we had relied on to lined sync our kicks peaks and valleys are no longer readily available thus making the task of phase cohesion infinitely harder. Nonetheless there are plugins designed for kick drum sound design offering a multitude of options or sonic sculpting.
Dedicated kick sound design plugin
- Kick 2
- Big Kick
- Parallel compression for synthwave drums
- Learn more on Synth bass mixing
- How to make synthwave melodies in Ableton tutorial
- Learn how to use foreshadowing on a synthwave track
- Learn how to create a whisper track
- Learn how to add VHS tape noise to a Synthwave track to make is sound totally retro
- Learn how to create better transitions in your arrangement
- Program synthesizers like a pro with this cool app
- Download the Free Synthwave Drum Selector
- Enroll in the synthwave masterclass
Conclusion
To some producers, the concept of kick drum layering is overkill – sometimes a single kick drum sample is enough. As the saying goes, if it ain’t broke…
On the other hand, kick drum layering offers creative options that you can deploy during the course of an arrangement.
Recent Posts
I’ve been producing synthwave for a long time now—and there’s one thing I see over and over again: Tracks that have good ideas… but still sound cheap. Not because the producer lacks...
How to Start Producing Synthwave: The Beginner’s Guide You Actually Need
Synthwave might sound like neon lights turned into music — nostalgic, dreamy, powerful, retro, and modern all at once. But if you’re just getting started, it can feel overwhelming: “What synth...