The synthwave genre is littered with tracks that exhibit a fair amount of detuning. Whether it’s heavenly pads, infectious melodies or nostalgic lead lines, detuning plays a critical role in synthwave music production. With origins dating as far back as the 80s, when a poorly maintained record player would cause a song to shift out of pitch, the detune effect as its known as, is widely used by modern synthwave producers. In this synthwave tutorial, we’ll share techniques to detune your synthwave track using Ableton stock plugins.
Question: What are the best plugins to detune a synthwave track?
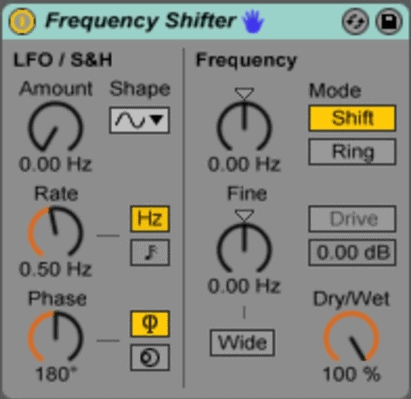
Answer: Besides Ableton Live’s built-in sampler device transpose control, the frequency shifter’s fine knob is widely used to detune signals. The frequency shifter is an Ableton Live native plugin that allows incremental shifts in pitch that is easily modulated through automation to give off a subtle, discreet and musical detuning effect.
Detune For Nostalgia
Hip hop producers are known to detune samples in classic hip hop tracks. In fact, they’ve been doing this for years. Moreover, lo-fi hip hop artists have taken this a step further by applying liberal amounts of detuning to any given soundtrack. To some listeners, the effect can seem jarring, but it does play a pivotal role in conveying nostalgia – in so much that the music sounds like it’s being played on a record player. This makes sense as most hip hop samples were likely sourced directly from vinyl records. Nonetheless, synthwave producers stand to gain a lot of production clout by implementing this widely popular detuning effect.
Best Plugins to Detune Audio
There was a time when owning a sampler device would run you literally thousands of dollars. Thanks to technological advancements in the audio recording industry, today’s samplers ship with most DAWs (digital audio workstations) with many possessing more processing power than their antiquated neon-era ancestors.
The good news is that Ableton Live ships with a host of powerful device samplers and plugins.
For the purpose of this tutorial, we’ll focus on two plugins to achieve our detuning goals.
- Frequency Shifter
- Ableton Live LFO
How To Detune Your Synthwave Track – Synthwave Tutorial
Watch the synthwave music production tutorial above as Julian, the SynthwavePro instructor, shares a creative approach to detuning an entire synthwave track. We’ll hardness powerful Ableton stock plugins to masterfully detune our track making it sound like it’s playing on a vinyl turntable. These are some of the basics of synthwave music production. Learn more about synthwave courses here
Frequency Shifter
Ableton Live ships with the frequency shifter. While many producers seek to purchase expensive plugins that detune tracks in any number of ways, the frequency shifter is all that is needed. Here are the steps to detune a synthwave track.

Use the Frequency Shifter’s “Fine” control to detune any signal that runs through. For best results, use tiny incremental changes as opposed to larger values. For instance, you can add the frequency shifter to a master channel and proceed to automate the “Fine” control to elicit a subtle yet audible detune effect. Remember that a little goes a long way, so you may have to highlight the detune effect at key points during your song while holding back during others.
- Learn more on Synth bass mixing
- Learn how to use foreshadowing on a synthwave track
- Learn how to create a whisper track
- Improve Your Music Production Workflow With This Easy Hack
- Learn how to add VHS tape noise to a Synthwave track to make is sound totally retro
- Learn how to create better transitions in your arrangement
What is an LFO?
LFO stands for low frequency oscillator and doesn’t produce any audible sound unlike oscillators commonly found on synthesizers. Instead, when mapped to a particular parameter, an LFO will modulate that parameter based on a series of predetermined values.
In short, LFOs are great devices that let you program the behavior of certain parameters.
How to Use an LFO to Detune a Synthwave Track?
With Ableton Live’s LFO tool inserted in a MIDI track, click on the “Map” button. The “Map” button will start to blink meaning that it is now ready for you to assign it to another parameter by simply click on it. Congrats! You’ve successfully tethered the LFO to a parameter. For the purpose of this tutorial, click on the “Fine” control located on the Frequency Shifter that is sitting on your master channel. If done correctly, the frequency shifter’s “Fine” control should begin to oscillate seemingly rapid.


How to Pitch Shift with Ableton’s LFO
Now that your LFO is tethered to the Fine control of the pitch shifter, go ahead and adjust the LFO’s rate and depth controls. The two parameters control the amount of oscillation that occurs on the Frequency Shifter’s Fine control.
Now play your track – you’ll notice how its pitch will slowly rise and fall. The key is to add a subtle amount – just enough so it’s slightly audible. Below are settings you can use in your own synthwave productions.
Tips:
Keep the LFO rate at 0.02 Hz and its depth at 1.79%.
Remember less is more.
Applications and Conclusion
You can always apply the LFO to a variety of parameters such as filter cut offs, pan pots and volume faders. For this synthwave tutorial however, we’ve used the LFO to creatively alter the pitch of our entire soundtrack courtesy of the frequency shifter. Lastly, apply this technique to synth groups and even return channels, but don’t over do it as a little goes a long way. Have fun!
Recent Posts
How to Start Producing Synthwave: The Beginner’s Guide You Actually Need
Synthwave might sound like neon lights turned into music — nostalgic, dreamy, powerful, retro, and modern all at once. But if you’re just getting started, it can feel overwhelming: “What synth...
Finding Inspiration in Writing Synthwave Music: Tapping into the Neon Muse
Synthwave is more than just a genre—it’s a vibe, a feeling, and a cinematic journey. With its roots buried deep in 1980s nostalgia, VHS textures, retrofuturistic fantasies, and analog warmth,...

